Tuesday, April 9, 2013

Smashed shadows...a thing of the past!


Have you ever been doing your make up  and next thing you know your eye shadow or powder foundation has fallen to the ground and shattered? You panic and begin furiously scooping as much as you can back into the container hoping it would magically mend its self so you won't have to throw it away but inevitably you always do...well ladies, those days are now over :) Thanks to a savvy pinner we can all rejoice in this super easy diy for smashed shadows. All you do is add a little bit of rubbing alcohol (or in my case pure acetone nail polish remover...its all I had!) to the shards of shadow, give it a little stir with a toothpick and let dry! The alcohol evaporates after a few minutes and leaves behind your perfect pallet! Its that easy! Just watch :)

Take your poor little shadow victim  (you can smash the pieces even more like I did to make it a little easier to "melt.")


Then add a tiny bit of rubbing alcohol (or pure acetone nail polish remover) and stir around until everything is all "dissolved" and smooth. 


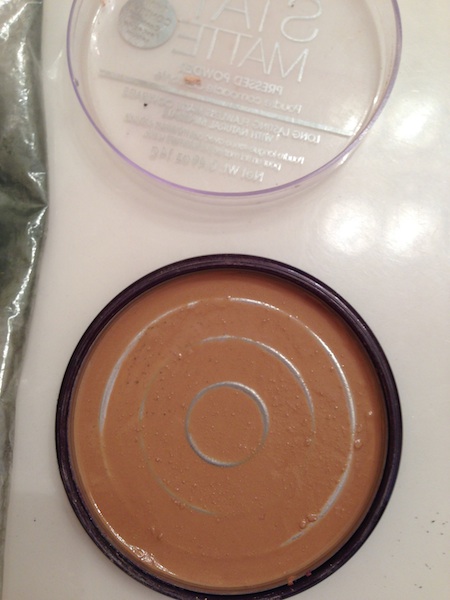
After you have mixed everything and its is good and smooth you simply wait about an hour for everything to dry and VOILA! You have your favorite shadows and foundations back to normal! I know...this totally changed my life too!!! :)


All in all this was a SUPER easy pin to do and it was free so I definitely give it 5/5 Pin points


 Let me know what you think! And if you have any requests or suggestions drop me a line in the comments section below thanks guys! <3


Thursday, March 14, 2013

Mason jar make over Part One


I have been dying to do this project since my earliest days of Pinterest (along with several million other mason jar DIY's that you will most likely be reading about in the posts to come) and this project was probably the easiest and most instantly gratifying DIY I have ever done. When finished these cute and colorful mason jars add a fresh pop of brightness to any room as a vase or container or any sort.


I started with two of my dozens of mason jars, squirted a big glob of regular craft paint into the  bottom of the jar and slowly turned it upside down to let the paint cover the whole jar. 


When it finally covered the jar, I found myself in a small predicament once I put the jars top down to drain the excess paint: so much paint dripped out that it prevented air from getting into the jar and kept it from drying. So I came up with a solution! I took some craft wire I had in my garage, bent it into a zigzag, and put the jars on the wire so that air could get in.


Because I used so much paint these jars ended up taking two full days to dry but once they did finally dry they turned out so pretty! They have made such a fun little showpiece in my house that I will probably make several more just to have around.


I give it 4/5 Pinpoints. This project was definitely worth my time, money, and effort. 

I definitely think you should give this project a try! Make sure you let me khow how it goes in the comments section below :)


Tuesday, March 5, 2013

Crayola Crapola...Too good to be true


We have all seen this one before and that is exactly why we decided to make this our first post. The beautiful cascade of colors elegantly trickling down the canvas to create a modern masterpiece from America's favorite brand of rainbow colored wax is probably the most popular pin out there and with a caption as intriguing as "just a hot glue gun and a hair dryer!" we all re-pin thinking how hard can it be?!

Well, they got us folks.

I went out and bought 4 boxes of crayons, a sturdy white poster board, a new hot glue gun (because even though we have repurchased the same thing at least three times it never seems to actually exist the one time a year I need it...) and pulled out the hair dryer.

I methodically separated the colors into rainbow order according to the all powerful ROY G BIV method and impatiently waited for the hot glue gun to heat up. When it finally started oozing clearish glue all over the place I began gluing the crayons onto the poster board one by one. Side note - I tried making a couple of horizontal stripes and sticking a few crayons on at once but this proved a fruitless effort as the glue was dry before I had two crayons down.


After the painstakingly arduous process of gluing the crayons I leaned the board against the back of a chair to keep it vertical and revved up the blow dryer. I began concentrating on only a small section of crayons at a time to prevent other crayons cooling if I "waved" it back and forth. It took a while (about 5 minutes) but they started melting! "YAY" I thought "its going to work and I am going to be the girl with the cool crayon art!" Oh how wrong I was. They started melting alright, wax paper and everything. Instead of dripping into beautiful cascading streams of color they began chunking and flaking into pieces all over the place. Chunks of crayon went flying and the paper all but caught on fire while the only thing dripping onto my canvas was the weird coating of wax on the crayon paper that in turn caused the hot glue to stop holding the crayon so then whole melt-y crayons went zooming down to the floor. It was a disaster and a huge let down. 


Maybe the reason it didn't work out as planned is because I opted for Dollar Tree crayons instead of Crayola brand but to be honest I wasn't willing to spend $6.50 a box. Don't forget to comment and let me know if yours turned out any better or if you have a horror story of your own.


I give it 2/5 PinPoints because while it is relatively cheap and the idea is great, the results aren't so easy to replicate.